曾经Android布局就一把梭,RelativeLayout+LinearLayout,直到用ConstraintLayout写了几个页面后发现是真的香,现在任何布局第一选择都是它。
ConstraintLayout是什么?
- 它属于Android JetPack,当前版本
implementation 'com.android.support.constraint:constraint-layout:1.1.3' - 作用是可以减少视图布局层级,很复杂的页面一般也就是两个层级能搞定
- 响应式布局代码更健壮,轻松适配不同分辨率
- 更好的可视化操作,通过Android Studio的Layout Editor就可以实时拖动编辑并预览布局效果
基本用法
问:布局基本三要素是什么?
答:位置,对齐,大小。
1,位置,View放在哪里
ConstraintLayout的做法和RelativeLayout是差不多的,实际使用起来Constraint Layout的字段语义更符合直觉。
| Relative Layout | Constraint Layout | |
|---|---|---|
| 垂直居中 | android:layout_centerVertical=”true” | app:layout_constraintBottom_toBottomOf=”parent” app:layout_constraintTop_toTopOf=”parent” |
| 居下 | android:layout_below=”@id/view” | app:layout_constraintTop_toBottomOf=”@id/view” |
| 居右 | android:layout_toEndOf=”@id/view” | app:layout_constraintStart_toEndOf=”@id/view” |
2,对齐,整整齐齐还是错落有致,当然是都要
严格来讲Relative Layout里面的子View之间是无法相互对齐的。有两种方式可以间接做到:是基于父视图对齐和嵌套一个ViewGroup比如LinearLayout来对齐。这也就是为什么即使用Relative Layout做的布局也很可能层数过多,出现overDraw。而ConstraintLayout就很优雅了,要领就是Start_toStartOf,End_toEndOf,Top_toTopOf,Bottom_toBottomOf两两结对出现就行。
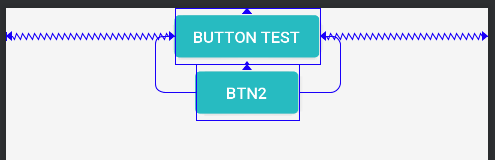
1 | // 上图示例,基于View水平对齐 |

1 | // 基于View垂直对齐 |
3,大小控制
基本用法和普通ViewGroup一致,无非就是wrap_content,0dp,margin,padding这些来控制View大小。
熟练掌握这些,已经可以愉快的和ConstraintLayout玩起来了,慢慢的也能体会到它的精妙之处,当然Constraintlayout还有些进阶用法。
进阶用法
1,Guideline(可以影响View的位置,大小,对齐方式)
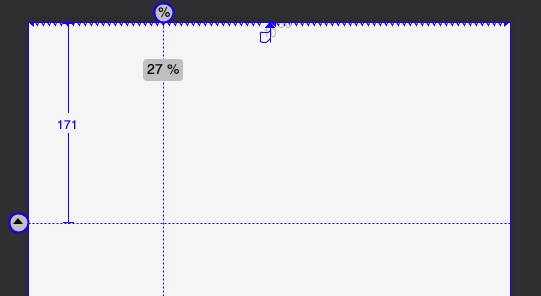
1 | // 不可见的辅助布局线,水平和垂直,数值和百分比都支持,常用来切割页面,辅助布局 |
2,Barrier(主要影响View的位置)
1 | // 同样是不可见的辅助布局线,区别于Guideline,它自己不定义位置,而且根据它绑定的View动态确定位置 |
3,Bias(偏移,影响位置)
1 | // Bias的起作用的前提是:有成对的水平约束(Start_toStartOf和End_toEndOf)或竖直约束(Top_toTopOf和 |
4,Chain(链条,影响位置和对齐)
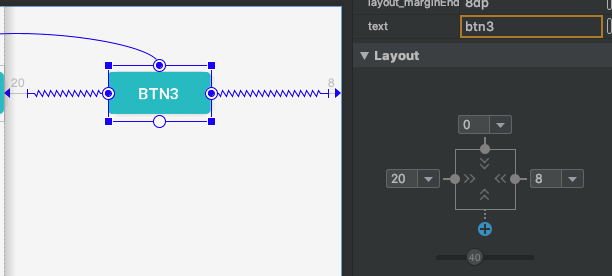
在ConstraintLayout中生成一个链条,最少只需要两个View相互指定Constraint。作用类似于Flex 布局中的轴axis。

1 | <Button |
Chain既然像Flex,那确实是可以像Flex类似的用的:
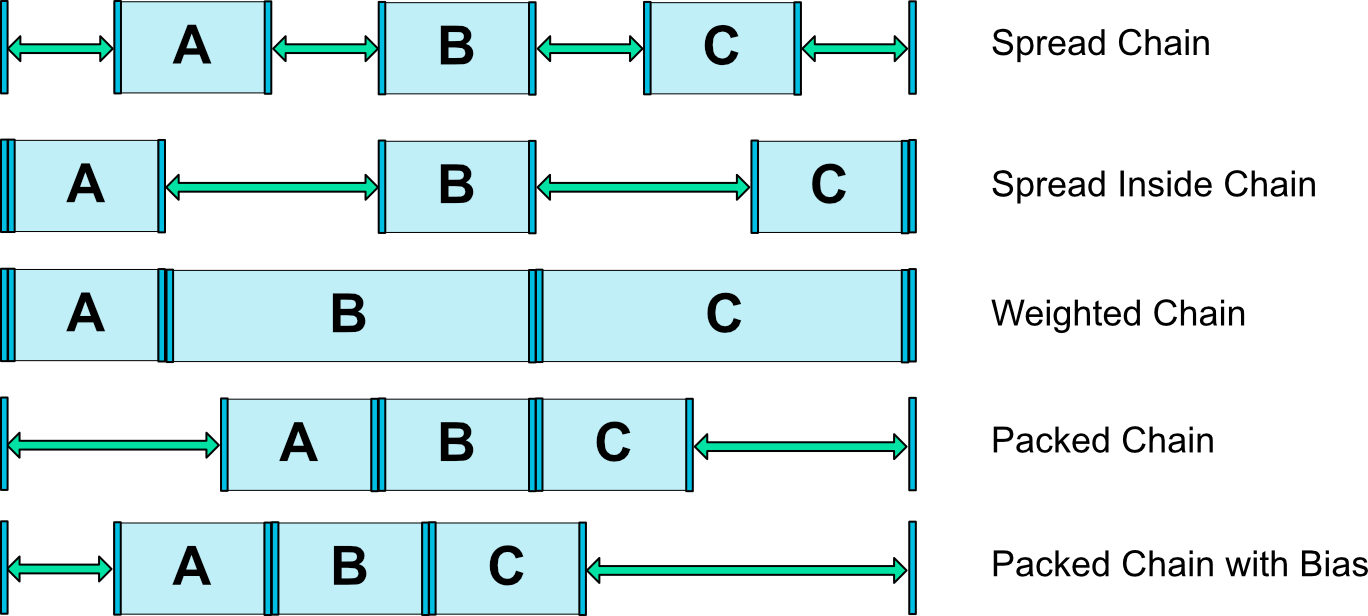
1 | // layout_constraintHorizontal_chainStyle 默认是spread,还有Packed和Spread Inside可以选, |

5,Ratio(比例,影响大小)
1 | // 根据宽高比例自适应View大小,至少一个被设为0dp(match_constraint),下面的代码你将收获一个全屏的按钮 |
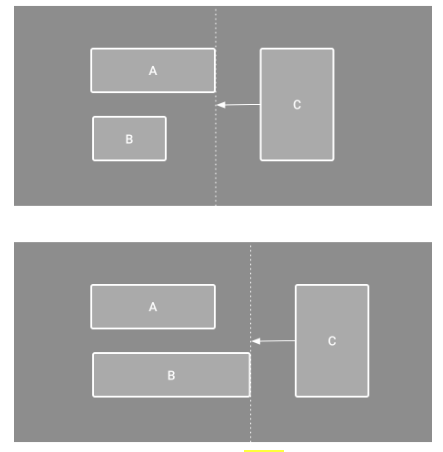
6,Visibility behavior(影响位置)
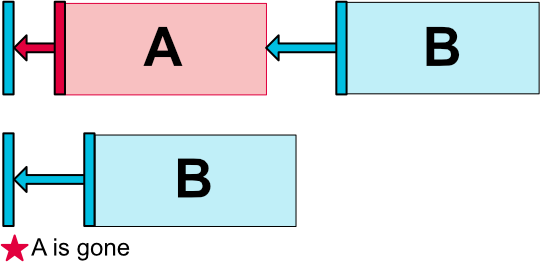
1 | // 如上图,A的margin_start 16,B的margin_start 20,那A变gone了,B希望start margin加大一点,只需要 |
7,Circular positioning(影响位置)

1 | // 比较少能用上,原理就是A根据原点半径和角度来定位B |
8,Keyframe animations(影响大小,位置,但不会改变颜色)
1 | // MotionLayout才是完全体,不过这个也很简单好用了 |
总结:用过就回不去了,没有Constraintlayout甚至不会布局。
参考
https://developer.android.com/reference/android/support/constraint/ConstraintLayout#VirtualHelpers
https://developer.android.com/training/constraint-layout#constrain-to-a-barrier